游戏人生
首页
(current)
GameDevTools
登陆
|
注册
个人中心
注销
游戏引擎 浅入浅出
Introduction
Introduction
前言
前言
1. 游戏引擎框架介绍
1. 游戏引擎框架介绍
1.1 Unity的组成
1.2 游戏引擎组成
2. Opengl开发环境搭建
2. Opengl开发环境搭建
2.1 Opengl到底是什么
2.2 搭建Opengl开发环境
2.3 使用VisualStudio开发
3. 绘制多边形
3. 绘制多边形
3.1 画个三角形
3.2 画个正方形
3.3 画个立方体
4. 着色器
4. 着色器
4.1 Unity Shader和OpenGL Shader
4.2 顶点着色器
4.3 片段着色器
5. 绘制贴图
5. 绘制贴图
5.1 颜色和贴图
5.2 贴图文件介绍
5.3 CPU与GPU的通信方式
5.4 使用stb_image解析图片
5.5 绘制带贴图的立方体盒子
5.6 压缩纹理
5.7 图片压缩工具
5.8 使用压缩纹理
5.9 DXT压缩纹理扩展
6. 索引与缓冲区对象
6. 索引与缓冲区对象
6.1 顶点索引
6.2 缓冲区对象
6.3 OpenGL Core Profile
6.4 顶点数组对象
7. 绘制Mesh和材质
7. 绘制Mesh和材质
7.1 导出Mesh文件
7.2 使用Mesh文件
7.3 Shader文件创建与使用
7.4 创建材质
7.5 使用材质
7.6 MeshRenderer
8. 绘制静态模型
8. 绘制静态模型
8.1 Blender安装与配置
8.2 Blender制作模型
8.3 Blender Python设置开发环境
8.4 Blender Python创建物体
8.5 Blender Python导出顶点数据
8.6 加载导出的Mesh
9. 基于组件开发
9. 基于组件开发
9.1 基于RTTR实现反射
9.2 实现GameObject-Component
10. 相机
10. 相机
10.1 最简单的相机
10.2 多相机渲染
10.3 相机排序
10.4 CullingMask
11. 控制系统
11. 控制系统
11.1 键盘控制
11.2 鼠标控制
12. 拆分引擎和项目
12. 拆分引擎和项目
13. 绘制文字
13. 绘制文字
13.1 TrueType简介
13.2 绘制单个字符
13.3 绘制多个文字
13.4 彩色字
14. GUI
14. GUI
14.1 正交相机
14.2 UIImage
14.3 UIMask
14.4 UIText
14.5 UIButton
15. 播放音效
15. 播放音效
15.1 播放2D音效
15.2 播放3D音效
15.3 使用FMOD Studio音频引擎
16. Profiler
16. Profiler
16.1 初识easy_profiler
16.2 集成easy_profiler
17. 嵌入Lua
17. 嵌入Lua
17.1 Sol2与C++交互
17.2 更加友好的Lua框架设计
17.3 引擎集成sol2
17.4 调试Lua
18. 骨骼动画
18. 骨骼动画
18.1 Blender制作骨骼动画
18.2 Blender导出骨骼动画
18.3 解析骨骼动画
18.4 矩阵的主序
19. 骨骼蒙皮动画
19. 骨骼蒙皮动画
19.1 骨骼蒙皮动画实现
19.2 骨骼权重
19.3 Blender蒙皮刷权重
19.4 Blender导出蒙皮权重
19.5 加载权重文件
20. 解析FBX文件
20. 解析FBX文件
20.1 导出Mesh
20.2 导出骨骼动画
20.3 导出权重
20.4 渲染骨骼蒙皮动画
21. 多线程渲染
21. 多线程渲染
21.1 GLFW多线程渲染
21.2 基于任务队列的多线程渲染
21.3 完全异步的多线程模型
21.4 引擎支持多线程渲染
22. Physx物理引擎
22. Physx物理引擎
22.1 Physx实例-小球掉落
22.2 物理材质
22.3 碰撞检测
22.4 连续碰撞检测
22.5 场景查询
22.6 引擎集成Physx
23. 经典光照
23. 经典光照
23.1 环境光
23.2 漫反射光照模型
23.3 镜面高光光照模型
23.4 高光贴图
23.5 Shader结构体
23.6 Uniform Buffer Object
23.7 方向光
23.8 点光源
23.9 多光源
24. 引擎编辑器的实现
24. 引擎编辑器的实现
24.1 分析Godot引擎编辑器
24.2 FBO RenderTexture GameTurbo DLSS
24.3 ImGui介绍与使用
24.4 分离引擎核心层和应用层
24.5 使用ImGui实现引擎编辑器
24.6 Hierarchy与Inspector面板
24.7 Geometry Buffer
25. Shadow Mapping
25. Shadow Mapping
25.1 深度图
25.2 简单阴影
88. VSCode扩展开发与定制
88. VSCode扩展开发与定制
88.1 第一个VSCode扩展程序
88.2 从源码编译VSCode
88.3 打包VSCode内置扩展
88.4 打包LuaHelper到Code-OSS
89. Doxygen生成API文档
89. Doxygen生成API文档
90. GPU分析工具
90. GPU分析工具
90.1 RenderDoc分析不显示bug
98. SubstancePainter插件开发
98. SubstancePainter插件开发
98.1 SP插件开发环境
98.2 开发SP功能性插件
98.3 开发SP渲染插件
99. Toolbag插件开发
99. Toolbag插件开发
99.1 插件开发环境
99.2 API介绍
99.3 命令行调用Toolbag
99.4 更多实现
99.5 代码参考
附录1. Wwise音频引擎
附录1. Wwise音频引擎
1.1 Wwise名词概念
1.2 Wwise制作音效导出SoundBank
1.3 集成Wwise
1.4 封装Wwise播放3D音效
1.5 Wwise性能分析器介绍
1.6 猎人开发后记
代码资源下载
点我下载
Github
点赞、收藏、关注
目录
<< 17.1 Sol2与C++交互
17.3 引擎集成sol2 >>
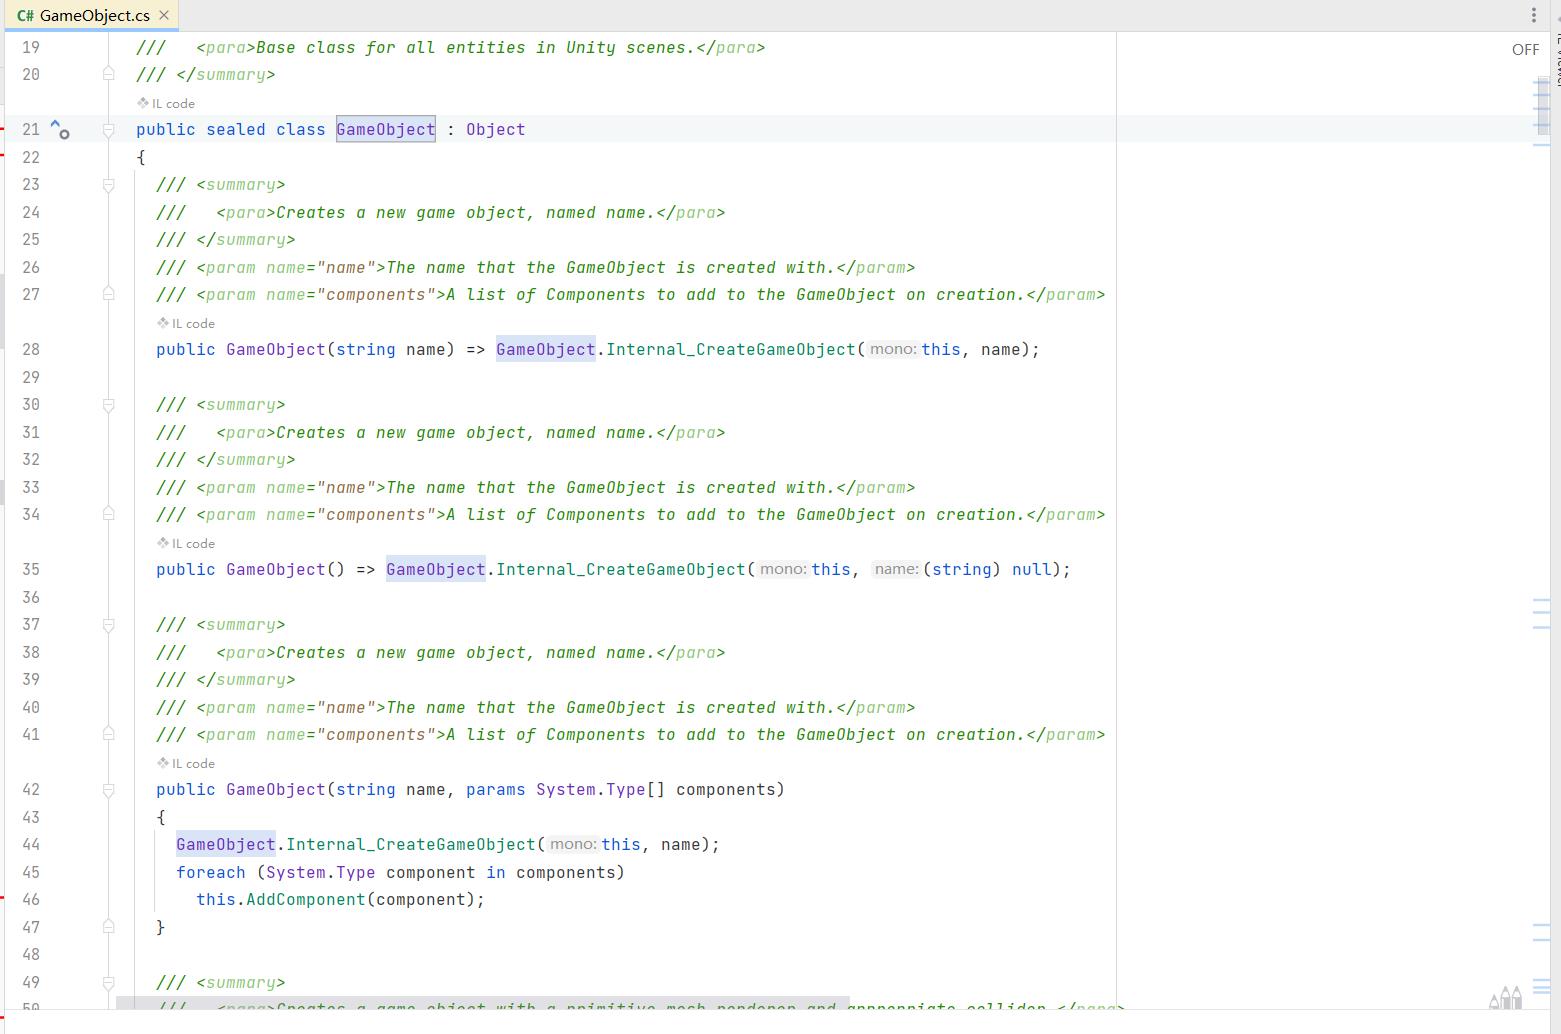
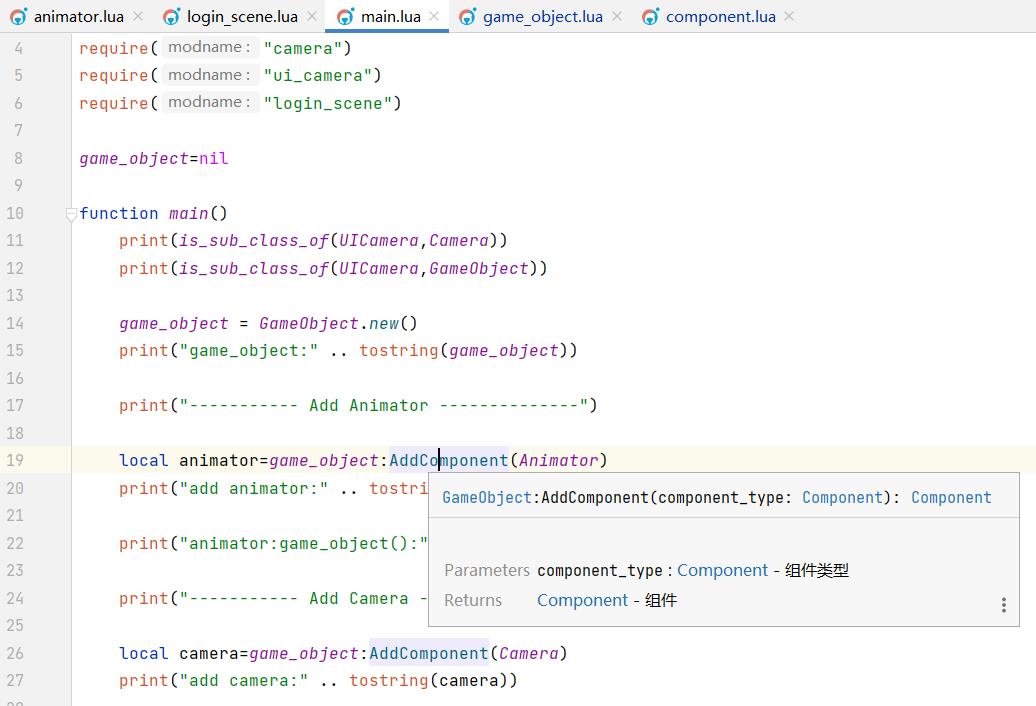
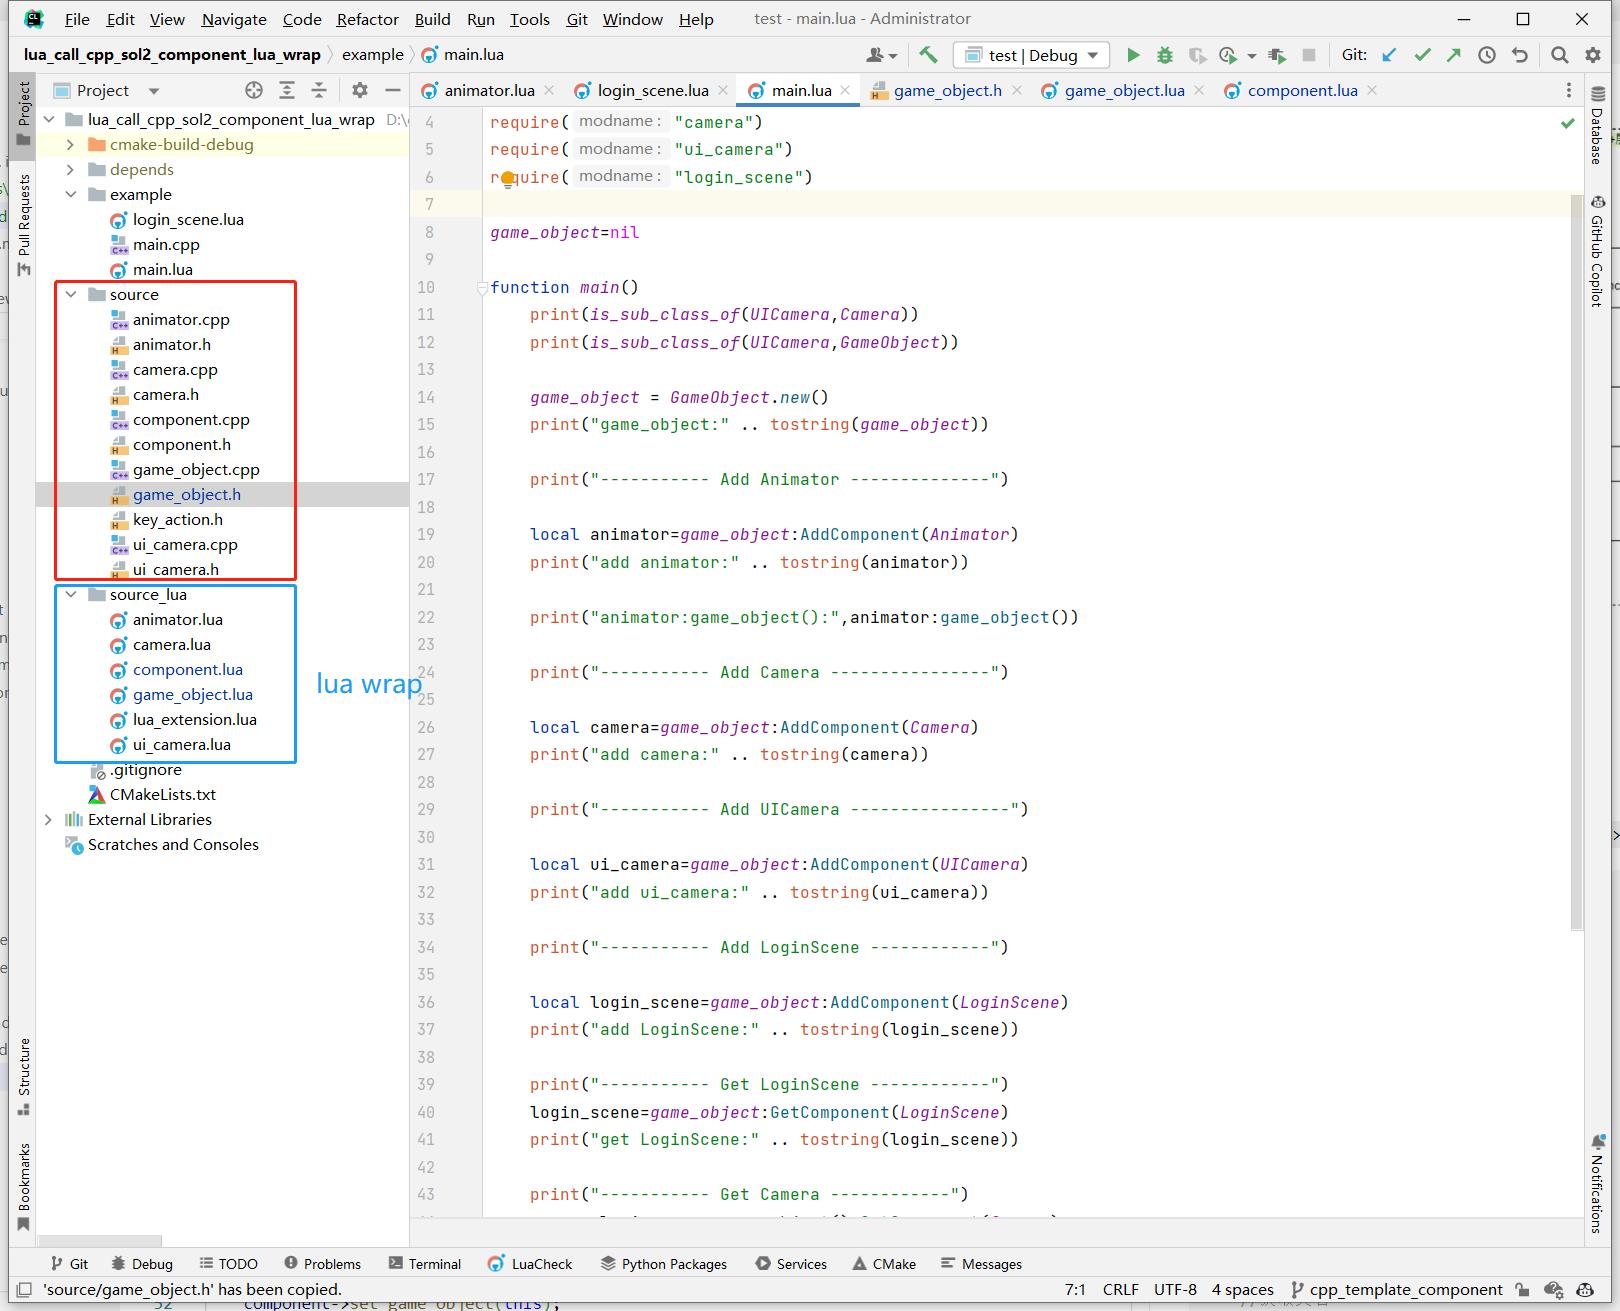
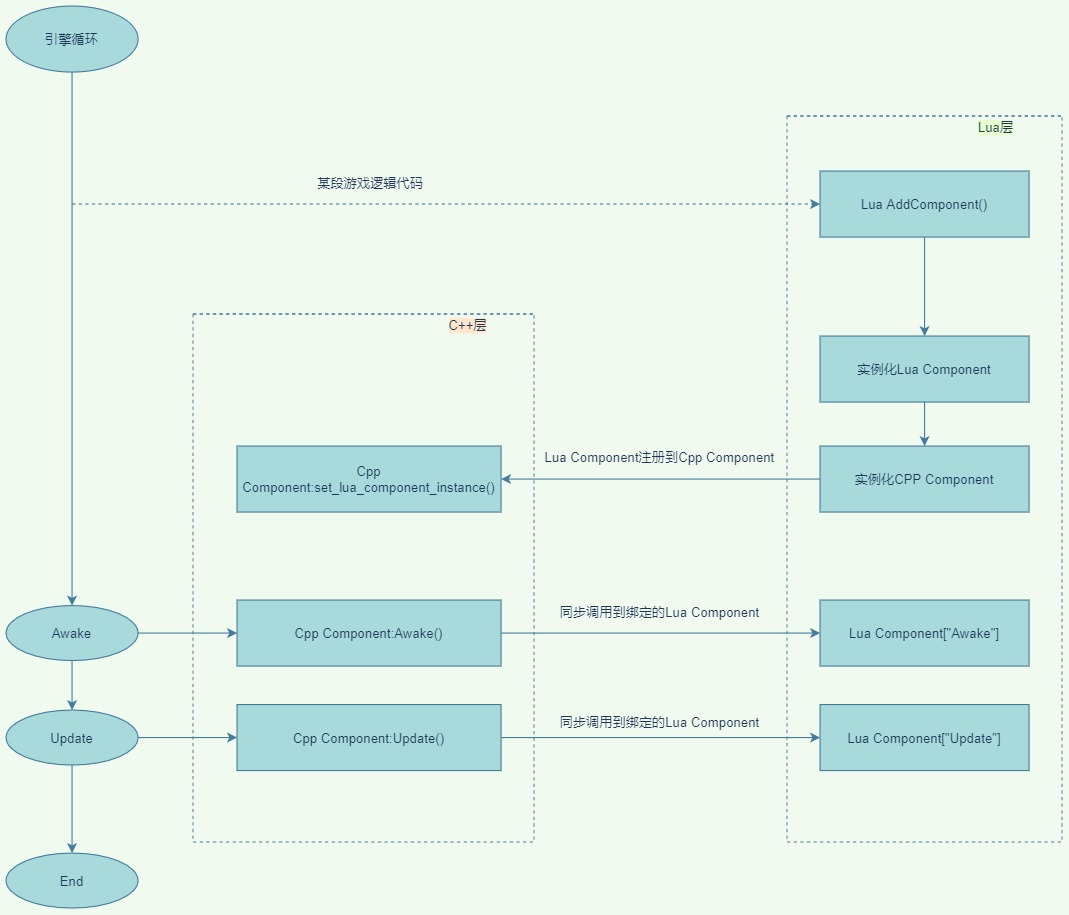
## 17.2 更加友好的Lua框架设计 ```text 「游戏引擎 浅入浅出」是一本开源电子书,PDF/随书代码/资源下载: https://github.com/ThisisGame/cpp-game-engine-book ``` ```bash CLion项目文件位于 samples/integrate_lua/integrate_lua/lua_call_cpp_sol2_component_lua_wrap ``` 虽然上一节集成了Lua,并融入到了GameObject-Component的模式中,但是有很多槽点: 1. <font color=red>GameObject同时管理着Cpp Component和Lua Component,并且两者是以Lua Table存在的。</font> 2. <font color=red>Lua逻辑代码直接调用了导出的Cpp接口,没有隔离Lua逻辑与Cpp Native底层接口,且没有代码提示。</font> 另外还有GameObject-Component的老问题: 1. <font color=red>AddComponent传入的参数是组件名,而不是`AddComponent<Type>()`这种形式。</font> 2. <font color=red>GetComponent也是上面这个问题。</font> 新老问题凑一堆,编写代码让人十分不爽,在使用Unity这么久之后,我觉得Unity集成Mono的经验可以套到Lua上。 我们在编写Unity逻辑时,只是面对C#,而不会面向C++ 导出的API编程,就是说Unity对C++ Native接口,在C#层都进行了一层Wrap。  这样隔离了游戏引擎使用者和引擎开发者,同时C#层的Wrap可以提供代码提示等辅助功能,也可以进行一定的定制操作。 于是花了很久设计了更加友好的Lua框架。 新框架的目的: 1. 支持使用`AddComponent<Type>()` ```lua local animator=game_object:AddComponent(Animator) ``` 2. 隔离,引擎使用者不需要接触到Cpp Native底层接口 3. 有代码提示  ### 1. 项目结构  从项目文件结构就看出,对每个C++ Class,都有对应的Lua Wrap,这样就可以实现目的2、3,对引擎使用者隔离了CPP Native底层接口,并且可以添加代码提示。 ### 2. AddComponent模板驱动 在C++侧,使用模板,来实现`AddComponent<Type>()`。 ```c++ //file:source/game_object.h line:36 /// 添加组件,仅用于C++中添加组件。 /// \tparam T 组件类型 /// \return 组件实例 template <class T=Component> T* AddComponent(){ T* component=new T(); AttachComponent(component); component->Awake(); return dynamic_cast<T*>(component); } /// 附加组件实例 /// \param component_instance_table void AttachComponent(Component* component){ component->set_game_object(this); //获取类名 type t=type::get(*component); std::string component_type_name=t.get_name().to_string(); if(components_map_.find(component_type_name)==components_map_.end()){ std::vector<Component*> component_vec; component_vec.push_back(component); components_map_[component_type_name]=component_vec; }else{ components_map_[component_type_name].push_back(component); } } ``` 在Lua侧,也有着单独的一套Component管理机制。 ```lua --file:source_lua/game_object.lua line:27 ---@param component_type Component @组件类型 ---@return Component @组件 function GameObject:AddComponent(component_type) local component_instance=component_type.new() if self.components_map_[component_type]==nil then self.components_map_[component_type]={} end table.insert(self.components_map_[component_type],component_instance) component_instance:set_game_object(self) return component_instance end --- 从GameObject上获取组件 --- @param component_type table @组件类型 --- @return table @组件实例 function GameObject:GetComponent(component_type) if self.components_map_[component_type] and #self.components_map_[component_type]>0 then return self.components_map_[component_type][1] end return nil end ``` Lua侧单独的Component管理机制,管理的其实是Lua侧的Component,而不是C++ 的Component。 来看下Lua Component的设计。 ```lua ---file:source_lua/component.lua ---@class Component @组件 Component={} function Component:ctor() self.game_object_=nil self:InitCppComponent() self:SetToCpp() end --- 创建对应的C++实例 function Component:InitCppComponent() self.cpp_component_instance_=Cpp.Component() end --- 将Lua Component绑定到C++端 function Component:SetToCpp() self.cpp_component_instance_:set_lua_component_instance(self) end --- 返回组件所属的GameObject --- @return GameObject @返回组件所属的GameObject function Component:game_object() return self.game_object_ end function Component:set_game_object(game_object) self.game_object_=game_object game_object:cpp_game_object_instance():AttachComponent(self.cpp_component_instance_) self.cpp_component_instance_:Awake() end function Component:Awake() print("Component:Awake") end function Component:Update() print("Component:Update") end ``` 以`Animator`这个C++ Component为例,当如下代码添加`Animator`:<a id="antiCollectorAdTxt" href="https://github.com/ThisisGame/cpp-game-engine-book">「游戏引擎 浅入浅出」是一本开源电子书,PDF/随书代码/资源下载: https://github.com/ThisisGame/cpp-game-engine-book</a> ```lua --file:example/main.lua line:19 local animator=game_object:AddComponent(Animator) ``` 首先走Lua `GameObject:AddComponent(component_type)` 接口。 ```lua --file:source_lua/game_object.lua line:27 ---@param component_type Component @组件类型 ---@return Component @组件 function GameObject:AddComponent(component_type) local component_instance=component_type.new() if self.components_map_[component_type]==nil then self.components_map_[component_type]={} end table.insert(self.components_map_[component_type],component_instance) component_instance:set_game_object(self) return component_instance end ``` 这里实例化了Lua Component,首先执行构造函数。 ```lua ---file:source_lua/component.lua ---@class Component @组件 Component={} function Component:ctor() self.game_object_=nil self:InitCppComponent() self:SetToCpp() end ``` 先执行子类 `Animator:InitCppComponent()`,创建对应的C++实例。 ```lua --file:source_lua/animator.lua line:15 function Animator:InitCppComponent() ---@type Cpp.Animator self.cpp_component_instance_=Cpp.Animator() --创建对应的C++实例 end ``` 然后将Lua Animator实例,注册到C++ Animator对象中。 ```lua --file:source_lua/component.lua line:22 --- 将Lua Component绑定到C++端 function Component:SetToCpp() self.cpp_component_instance_:set_lua_component_instance(self) end ``` ```c++ //file:source/component.h line:25 /// 设置对应的Lua组件 /// \param lua_component_instance void set_lua_component_instance(sol::table& lua_component_instance){ lua_component_instance_=lua_component_instance; } ``` 此时,Lua Animator 与 C++ Animator 就关联起来了,后续对 C++ Animator 的`Awake()` `Update()`就可以很方便的同步到 Lua Animator。 然后再让 C++ Animator 对象,挂到 GameObject 上。 ```lua function Component:set_game_object(game_object) self.game_object_=game_object game_object:cpp_game_object_instance():AttachComponent(self.cpp_component_instance_) self.cpp_component_instance_:Awake() end ``` 这样,在Lua AddComponent的同时,也在C++ AddComponent了一份。 当C++ Animator调用`Awake()`时,同步到Lua Animator实例。 ```c++ //file:source/component.h line:31 /// 同步调用Lua组件函数 /// \param function_name void SyncLuaComponent(const char* function_name){ if (!lua_component_instance_.valid()){ return; } sol::protected_function function_awake=lua_component_instance_[function_name]; if(!function_awake.valid()){ return; } auto result=function_awake(); if(result.valid()== false){ sol::error err = result; type t=type::get(this); std::string component_type_name=t.get_name().to_string(); SPDLOG_ERROR("\n---- RUN LUA_FUNCTION ERROR ----\nComponent call Awake error,type:{}\n{}\n------------------------",component_type_name,err.what()); } } virtual void Awake(){ std::cout<<"Cpp.Component Awake"<<std::endl; SyncLuaComponent("Awake"); }; virtual void Update(){ std::cout<<"Cpp.Component Update"<<std::endl; SyncLuaComponent("Update"); }; ``` 以`AddComponent<Type>()`这个接口,来描述新的框架设计:  觉得比较绕的话,多调试几次就理解了。
<< 17.1 Sol2与C++交互
17.3 引擎集成sol2 >>
12
代码资源下载
点我下载
Github
点赞、收藏、关注
目录
Introduction
Introduction
前言
前言
1. 游戏引擎框架介绍
1. 游戏引擎框架介绍
1.1 Unity的组成
1.2 游戏引擎组成
2. Opengl开发环境搭建
2. Opengl开发环境搭建
2.1 Opengl到底是什么
2.2 搭建Opengl开发环境
2.3 使用VisualStudio开发
3. 绘制多边形
3. 绘制多边形
3.1 画个三角形
3.2 画个正方形
3.3 画个立方体
4. 着色器
4. 着色器
4.1 Unity Shader和OpenGL Shader
4.2 顶点着色器
4.3 片段着色器
5. 绘制贴图
5. 绘制贴图
5.1 颜色和贴图
5.2 贴图文件介绍
5.3 CPU与GPU的通信方式
5.4 使用stb_image解析图片
5.5 绘制带贴图的立方体盒子
5.6 压缩纹理
5.7 图片压缩工具
5.8 使用压缩纹理
5.9 DXT压缩纹理扩展
6. 索引与缓冲区对象
6. 索引与缓冲区对象
6.1 顶点索引
6.2 缓冲区对象
6.3 OpenGL Core Profile
6.4 顶点数组对象
7. 绘制Mesh和材质
7. 绘制Mesh和材质
7.1 导出Mesh文件
7.2 使用Mesh文件
7.3 Shader文件创建与使用
7.4 创建材质
7.5 使用材质
7.6 MeshRenderer
8. 绘制静态模型
8. 绘制静态模型
8.1 Blender安装与配置
8.2 Blender制作模型
8.3 Blender Python设置开发环境
8.4 Blender Python创建物体
8.5 Blender Python导出顶点数据
8.6 加载导出的Mesh
9. 基于组件开发
9. 基于组件开发
9.1 基于RTTR实现反射
9.2 实现GameObject-Component
10. 相机
10. 相机
10.1 最简单的相机
10.2 多相机渲染
10.3 相机排序
10.4 CullingMask
11. 控制系统
11. 控制系统
11.1 键盘控制
11.2 鼠标控制
12. 拆分引擎和项目
12. 拆分引擎和项目
13. 绘制文字
13. 绘制文字
13.1 TrueType简介
13.2 绘制单个字符
13.3 绘制多个文字
13.4 彩色字
14. GUI
14. GUI
14.1 正交相机
14.2 UIImage
14.3 UIMask
14.4 UIText
14.5 UIButton
15. 播放音效
15. 播放音效
15.1 播放2D音效
15.2 播放3D音效
15.3 使用FMOD Studio音频引擎
16. Profiler
16. Profiler
16.1 初识easy_profiler
16.2 集成easy_profiler
17. 嵌入Lua
17. 嵌入Lua
17.1 Sol2与C++交互
17.2 更加友好的Lua框架设计
17.3 引擎集成sol2
17.4 调试Lua
18. 骨骼动画
18. 骨骼动画
18.1 Blender制作骨骼动画
18.2 Blender导出骨骼动画
18.3 解析骨骼动画
18.4 矩阵的主序
19. 骨骼蒙皮动画
19. 骨骼蒙皮动画
19.1 骨骼蒙皮动画实现
19.2 骨骼权重
19.3 Blender蒙皮刷权重
19.4 Blender导出蒙皮权重
19.5 加载权重文件
20. 解析FBX文件
20. 解析FBX文件
20.1 导出Mesh
20.2 导出骨骼动画
20.3 导出权重
20.4 渲染骨骼蒙皮动画
21. 多线程渲染
21. 多线程渲染
21.1 GLFW多线程渲染
21.2 基于任务队列的多线程渲染
21.3 完全异步的多线程模型
21.4 引擎支持多线程渲染
22. Physx物理引擎
22. Physx物理引擎
22.1 Physx实例-小球掉落
22.2 物理材质
22.3 碰撞检测
22.4 连续碰撞检测
22.5 场景查询
22.6 引擎集成Physx
23. 经典光照
23. 经典光照
23.1 环境光
23.2 漫反射光照模型
23.3 镜面高光光照模型
23.4 高光贴图
23.5 Shader结构体
23.6 Uniform Buffer Object
23.7 方向光
23.8 点光源
23.9 多光源
24. 引擎编辑器的实现
24. 引擎编辑器的实现
24.1 分析Godot引擎编辑器
24.2 FBO RenderTexture GameTurbo DLSS
24.3 ImGui介绍与使用
24.4 分离引擎核心层和应用层
24.5 使用ImGui实现引擎编辑器
24.6 Hierarchy与Inspector面板
24.7 Geometry Buffer
25. Shadow Mapping
25. Shadow Mapping
25.1 深度图
25.2 简单阴影
88. VSCode扩展开发与定制
88. VSCode扩展开发与定制
88.1 第一个VSCode扩展程序
88.2 从源码编译VSCode
88.3 打包VSCode内置扩展
88.4 打包LuaHelper到Code-OSS
89. Doxygen生成API文档
89. Doxygen生成API文档
90. GPU分析工具
90. GPU分析工具
90.1 RenderDoc分析不显示bug
98. SubstancePainter插件开发
98. SubstancePainter插件开发
98.1 SP插件开发环境
98.2 开发SP功能性插件
98.3 开发SP渲染插件
99. Toolbag插件开发
99. Toolbag插件开发
99.1 插件开发环境
99.2 API介绍
99.3 命令行调用Toolbag
99.4 更多实现
99.5 代码参考
附录1. Wwise音频引擎
附录1. Wwise音频引擎
1.1 Wwise名词概念
1.2 Wwise制作音效导出SoundBank
1.3 集成Wwise
1.4 封装Wwise播放3D音效
1.5 Wwise性能分析器介绍
1.6 猎人开发后记